
影絵展をみて、シンプルな模様の繰り返しってかっこいいなぁ、と思ったので、ケーキ1ピースくらいの黒いキャンバスに白で好きな模様を書き込めて、ボタンを押すとそれのコピーで円を表示するという感じのiPhoneアプリを書いてみる
動作イメージ
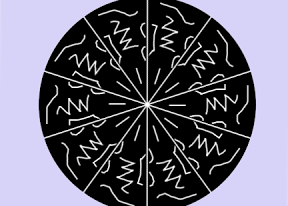
XcodeからiOS6 iPhone Simulatorで動かすとこんな感じになります。
ポイント
UIViewのコピーの際に、白い色は透明にするように、CGImageCreateWithMaskingColorsを利用しています。コピーはUIGraphicsBeginImageContextWithOptions(CGSizeMake(320, 470), YES, 1.0) というようにWithOption付きのContextを使いました。
サンプルコード
#import “ViewController.h”
#import <QuartzCore/QuartzCore.h>
@interface ViewController () {
UIView *mycanvas;
UIBezierPath *whitePath;
CAShapeLayer *whiteSL;
UILabel *btn;
}
@end
@implementation ViewController
– (void)viewDidLoad
{
[super viewDidLoad];
self.view.backgroundColor = [UIColor whiteColor];
[self createCanvas];
[self createBtn];
}
– (void)createCanvas
{
mycanvas = [[UIView alloc] initWithFrame:self.view.bounds];
mycanvas.backgroundColor = [UIColor clearColor];
[self.view addSubview:mycanvas];
UIBezierPath *path = [UIBezierPath bezierPath];
[path addArcWithCenter:CGPointMake(160, 450) radius:400 startAngle:-M_PI*0.6 endAngle:-M_PI*0.4 clockwise:YES];
[path addLineToPoint:CGPointMake(160, 450)];
[path closePath];
CAShapeLayer *sl = [CAShapeLayer layer];
sl.fillColor = [UIColor blackColor].CGColor;
sl.path = path.CGPath;
[mycanvas.layer addSublayer:sl];
}
– (void)touchesBegan:(NSSet *)touches withEvent:(UIEvent *)event
{
CGPoint p = [[touches anyObject] locationInView:mycanvas];
whitePath = [UIBezierPath bezierPath];
[whitePath moveToPoint:p];
whiteSL = [CAShapeLayer layer];
whiteSL.fillColor = [UIColor clearColor].CGColor;
whiteSL.strokeColor = [UIColor whiteColor].CGColor;
whiteSL.lineWidth = 5;
whiteSL.path = whitePath.CGPath;
[mycanvas.layer addSublayer:whiteSL];
}
– (void)touchesMoved:(NSSet *)touches withEvent:(UIEvent *)event
{
CGPoint p = [[touches anyObject] locationInView:mycanvas];
[whitePath addLineToPoint:p];
whiteSL.path = whitePath.CGPath;
}
– (void)createBtn
{
btn = [[UILabel alloc] init];
btn.text = @”Show!”;
btn.font = [UIFont fontWithName:@”Chalkduster” size:40];
[btn sizeToFit];
btn.center = CGPointMake(160, 500);
[self.view addSubview:btn];
btn.userInteractionEnabled = YES;
UITapGestureRecognizer *tap = [[UITapGestureRecognizer alloc] initWithTarget:self action:@selector(tap)];
[btn addGestureRecognizer:tap];
}
– (void)tap
{
if ([btn.text isEqual:@”Show!”]) {
mycanvas.transform = CGAffineTransformTranslate(mycanvas.transform, 0, –150);
mycanvas.transform = CGAffineTransformScale(mycanvas.transform, 0.4, 0.4);
UIGraphicsBeginImageContextWithOptions(CGSizeMake(320, 470), YES, 1.0);
[self.view.layer renderInContext:UIGraphicsGetCurrentContext()];
UIImage *img = UIGraphicsGetImageFromCurrentImageContext();
UIGraphicsEndImageContext();
const float colorMasking[6] = {255,255,255,255,255,255};
UIImage *masked = [UIImage imageWithCGImage:CGImageCreateWithMaskingColors(img.CGImage, colorMasking)];
[mycanvas removeFromSuperview];
for (int i=0; i<10; i++) {
UIView *vcopy = [[UIImageView alloc] initWithImage:masked];
vcopy.layer.anchorPoint = CGPointMake(0.5, 0.42);
[self.view addSubview:vcopy];
vcopy.transform = CGAffineTransformMakeRotation(i * M_PI / 5.0);
}
btn.text = @”clear”;
}
else {
self.view.layer.sublayers = nil;
[self createCanvas];
[self createBtn];
btn.text = @”Show!”;
}
}
– (void)didReceiveMemoryWarning
{
[super didReceiveMemoryWarning];
// Dispose of any resources that can be recreated.
}
@end