
ペンと紙で昔よくやった棒消しゲーム。二人で山形の棒を順番に消していって、最後の一本を消すことになった方の負けです。今回は、「1、2、3、4、5、6」と棒を6段にした棒消しiPhoneアプリの作り方を書いてみます。
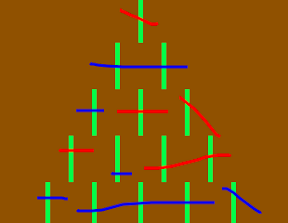
動作イメージ
XcodeからiOS6 iPhone Simulatorで動かすとこんな感じになります。
ポイント
棒をfor文でならべるときに、まずその列の左端の座標を計算して、そこから、一定の幅でループの回数分棒のUIViewを追加しています。CAShapeLayerを赤と青の2つ用意して、touchイベントの中で順番に赤、青のレイヤーに指の軌跡を表示しています。
サンプルコード
#import “ViewController.h”
#import <QuartzCore/QuartzCore.h>
#define UIColorHex(rgbValue) [UIColor colorWithRed:((float)((rgbValue & 0xFF0000) >> 16))/255.0 green:((float)((rgbValue & 0xFF00) >> 8))/255.0 blue:((float)(rgbValue & 0xFF))/255.0 alpha:1.0]
@interface ViewController () {
BOOL isRed;
CAShapeLayer *redLayer, *blueLayer;
UIBezierPath *redPath, *bluePath;
}
@end
@implementation ViewController
– (void)viewDidLoad
{
[super viewDidLoad];
self.view.backgroundColor = [self colorTheme:3];
[self createSticks];
[self createClearButton];
}
– (void)createSticks
{
float d = 50;
for (int i=0; i<6; i++) {
// left side
float left = self.view.center.x – i * (d/2.0);
for (int j=0; j<i+1; j++) {
UIView *stick = [[UIView alloc] initWithFrame:CGRectMake(0, 0, 5, d)];
stick.backgroundColor = [self colorTheme:4];
stick.center = CGPointMake(left + j * d, i * d + 50);
[self.view addSubview:stick];
}
}
}
– (void)createClearButton
{
UILabel *clearBtn = [[UILabel alloc] initWithFrame:CGRectMake(0, 0, 100, 80)];
clearBtn.text = @”clear”;
clearBtn.textColor = [self colorTheme:3];
clearBtn.font = [UIFont boldSystemFontOfSize:30];
clearBtn.center = CGPointMake(160, 400);
clearBtn.backgroundColor = [self colorTheme:1];
clearBtn.textAlignment = 1;
[self.view addSubview:clearBtn];
clearBtn.userInteractionEnabled = YES;
UITapGestureRecognizer *tap = [[UITapGestureRecognizer alloc] initWithTarget:self action:@selector(clear)];
[clearBtn addGestureRecognizer:tap];
}
– (void)clear
{
[redLayer removeFromSuperlayer];
redLayer = nil;
redPath = nil;
[blueLayer removeFromSuperlayer];
blueLayer = nil;
blueLayer = nil;
}
– (void)touchesBegan:(NSSet *)touches withEvent:(UIEvent *)event
{
CGPoint p = [[touches anyObject] locationInView:self.view];
if (!redLayer) {
redLayer = [[CAShapeLayer alloc] initWithLayer:self.view.layer];
redLayer.fillColor = [UIColor clearColor].CGColor;
redLayer.strokeColor = [self colorTheme:0].CGColor;
redLayer.lineWidth = 3;
redPath = [UIBezierPath bezierPath];
redLayer.path = redPath.CGPath;
[self.view.layer addSublayer:redLayer];
blueLayer = [[CAShapeLayer alloc] initWithLayer:self.view.layer];
blueLayer.fillColor = [UIColor clearColor].CGColor;
blueLayer.strokeColor = [self colorTheme:2].CGColor;
blueLayer.lineWidth = 3;
bluePath = [UIBezierPath bezierPath];
blueLayer.path = bluePath.CGPath;
[self.view.layer addSublayer:blueLayer];
}
if (isRed) {
[redPath moveToPoint:p];
} else {
[bluePath moveToPoint:p];
}
}
– (void)touchesMoved:(NSSet *)touches withEvent:(UIEvent *)event
{
CGPoint p = [[touches anyObject] locationInView:self.view];
if (isRed) {
[redPath addLineToPoint:p];
redLayer.path = redPath.CGPath;
} else {
[bluePath addLineToPoint:p];
blueLayer.path = bluePath.CGPath;
}
}
– (void)touchesEnded:(NSSet *)touches withEvent:(UIEvent *)event
{
isRed = !isRed;
}
– (UIColor*)colorTheme:(int)i
{
switch (i) {
case 0:
return UIColorHex(0x1C0CE8);
case 1:
return UIColorHex(0x0DFFA4);
case 2:
return UIColorHex(0xFF0000);
case 3:
return UIColorHex(0x85540B);
case 4:
return UIColorHex(0x72FF67);
default:
break;
}
return nil;
}
– (void)didReceiveMemoryWarning
{
[super didReceiveMemoryWarning];
}
@end