
なぞったところにあるパネルを裏返してお絵描きしていくiPhoneアプリを書いてみます。
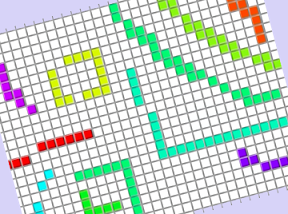
動作イメージ
XcodeからiOS6 iPhone Simulatorで動かすとこんな感じになります。
サンプルコード
#import “ViewController.h”
#import <QuartzCore/QuartzCore.h>
@interface ViewController () {
NSMutableArray *panels;
UIColor *mcolor;
}
@end
@implementation ViewController
– (void)viewDidLoad
{
[super viewDidLoad];
[self createPanels];
}
– (void)createPanels
{
panels = [[NSMutableArray alloc] init];
int rows = 300 / 12;
int cols = 530 / 12;
for (int i=0; i< rows * cols ; i++) {
float x = (i % rows) * 12 + 10;
float y = (i / rows) * 12 + 10;
UIView *p = [[UIView alloc] initWithFrame:CGRectMake(x, y, 10, 10)];
p.backgroundColor = [UIColor whiteColor];
p.layer.shadowOffset = CGSizeMake(2, 2);
p.layer.shadowOpacity = 0.4;
p.layer.shadowRadius = 2;
[self.view addSubview:p];
[panels addObject:p];
}
}
– (void)touchesBegan:(NSSet *)touches withEvent:(UIEvent *)event
{
float hue = (arc4random() % 20) / 20.0;
mcolor = [UIColor colorWithHue:hue saturation:1 brightness:1 alpha:1];
}
– (void)touchesMoved:(NSSet *)touches withEvent:(UIEvent *)event
{
CGPoint p = [[touches anyObject] locationInView:self.view];
for (UIView *panel in panels) {
if (CGRectContainsPoint(panel.frame, p)) {
[UIView animateWithDuration:0.2 animations:^{
panel.layer.transform = CATransform3DMakeRotation(M_PI/2.0, 0, 1, 0);
} completion:^(BOOL finished) {
panel.backgroundColor = mcolor;
[UIView animateWithDuration:0.2 animations:^{
panel.layer.transform = CATransform3DIdentity;
}];
}];
}
}
}
– (void)didReceiveMemoryWarning
{
[super didReceiveMemoryWarning];
// Dispose of any resources that can be recreated.
}
@end