UISwitchをつかって、ドミノのように文字とかを浮かび上がらせてみる
(XcodeのiOS6 iPhone Simulatorで動かしました。)
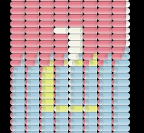
UISwitchのをうまく使ってなにか文字でも書けないかと
思い立ち、1、2、顔という感じで、文字が浮かぶように、
Switchに色を設定して、あとは時間差でプログラムから
ON/OFFを制御して見ました。
ポイント
・Switchはテキストを消したかったので、
tintColorではなくonImage offImageで色を制御
・UIGraphicsのImageContextを利用して、色UIImageをプログラム内で生成

サンプルコード
#import “ViewController.h”
@interface ViewController () {
UIColor *color1, *color2, *color3, *color4, *color5;
}
@end
@implementation ViewController
– (void)viewDidLoad
{
[super viewDidLoad];
self.view.backgroundColor = [UIColor blackColor];
// 242,107,122
color1 = [UIColor colorWithRed:242.0/255.0 green:107.0/255.0 blue:122.0/255.0 alpha:1.0];
// 240,242,220
color2 = [UIColor colorWithRed:240.0/255.0 green:242.0/255.0 blue:220.0/255.0 alpha:1.0];
// 217,235,82
color3 = [UIColor colorWithRed:217.0/255.0 green:235.0/255.0 blue:82.0/255.0 alpha:1.0];
// 138,199,222
color4 = [UIColor colorWithRed:138.0/255.0 green:199.0/255.0 blue:222.0/255.0 alpha:1.0];
// 135,121,111
color5 = [UIColor colorWithRed:135.0/255.0 green:121.0/255.0 blue:111.0/255.0 alpha:1.0];
// switch frame size
//79.000000 27.000000
for (int i=0; i<240; i++) {
float x = (i%8) * 60 * 0.5 + 20;
float y = (i/8) * 27 * 0.5;
UISwitch *s = [[UISwitch alloc] initWithFrame:CGRectMake(x, y, 0, 0)];
s.backgroundColor = [UIColor blackColor];
s.onImage = [self imageWithColor:color1];
s.offImage = [self imageWithColor:[UIColor whiteColor]];
s.thumbTintColor = [UIColor clearColor];
s.tag = i;
[self.view addSubview:s];
s.transform = CGAffineTransformMakeScale(0.5, 0.5);
}
}
– (void)one
{
NSArray *targets = [@”59 60 68 76 84 92 100 108 116 124 132 140 148 155 156 157″ componentsSeparatedByString:@” “];
for (int i=0; i<[self.view.subviews count]; i++) {
UISwitch *s = [self.view.subviews objectAtIndex:i];
if ([targets containsObject:[NSString stringWithFormat:@”%d”, s.tag]]) {
s.onImage = [self imageWithColor:color2];
}
[self execute:^{
[s setOn:YES animated:YES];
} afterDelay:i * 0.01];
}
}
– (void)two
{
NSArray *targets = [@”58 59 60 61 69 77 85 93 101 100 99 98 106 114 122 130 138 146 154 155 156 157″ componentsSeparatedByString:@” “];
for (int i=[self.view.subviews count]-1; i>=0; i–) {
UISwitch *s = [self.view.subviews objectAtIndex:i];
if ([targets containsObject:[NSString stringWithFormat:@”%d”, s.tag]]) {
s.offImage = [self imageWithColor:color3];
} else {
s.offImage = [self imageWithColor:color4];
}
[self execute:^{
[s setOn:NO animated:YES];
} afterDelay:([self.view.subviews count] – i) * 0.01];
}
}
– (void)smile
{
NSArray *targets = [@”50 58 53 61 101 108 107 98″ componentsSeparatedByString:@” “];
for (int i=0; i<[self.view.subviews count]; i++) {
UISwitch *s = [self.view.subviews objectAtIndex:i];
s.onImage = [self imageWithColor:color5];
if ([targets containsObject:[NSString stringWithFormat:@”%d”, s.tag]]) {
s.onImage = [self imageWithColor:color1];
}
[self execute:^{
[s setOn:YES animated:YES];
} afterDelay:i * 0.01];
}
}
– (void)execute:(void (^)(void))block afterDelay:(NSTimeInterval)delay
{
[self performSelector:@selector(executeBlock:) withObject:block afterDelay:delay];
}
– (void)executeBlock:(void (^)(void))block {
block();
}
– (void)touchesBegan:(NSSet *)touches withEvent:(UIEvent *)event
{
[self execute:^{
[self one];
} afterDelay:1];
[self execute:^{
[self two];
} afterDelay:4];
[self execute:^{
[self smile];
} afterDelay:7];
}
// 単色のUIImageを作る
// Create UIImage From UIColor
– (UIImage *)imageWithColor:(UIColor *)color {
CGRect rect = CGRectMake(0.0f, 0.0f, 80.0f, 40.0f);
UIGraphicsBeginImageContext(rect.size);
CGContextRef context = UIGraphicsGetCurrentContext();
CGContextSetFillColorWithColor(context, [color CGColor]);
CGContextFillRect(context, rect);
UIImage *image = UIGraphicsGetImageFromCurrentImageContext();
UIGraphicsEndImageContext();
return image;
}
– (void)didReceiveMemoryWarning
{
[super didReceiveMemoryWarning];
// Dispose of any resources that can be recreated.
}
@end